XXL-JOB 是基于mysql的分布式任务调度系统,是中心化调度的,包括调度中心和执行器
调度中心负责调度任务,执行器接受调度执行任务
执行器会注册到调度中心,调度中心也有自己的后台可以配置执行器配置任务,可以小流量调试任务,可以随开随停任务。
调度中心支持多节点集群部署,在调度时会基于mysql 行锁来保证只有个调度中心去执行作业的调度。
作业的相关信息也是存储在mysql。
执行器也可以集群部署。
首先,搭建一个XXL-JOB的调度中心,整个任务系统的大脑
https://gitee.com/xuxueli0323/xxl-job 下载下来源码
我们切到2.1.2版本

注意调度中心和执行器最好是同一个版本,不然后面我们调试任务会各种报错


换成同版本的就解了。。。版本不兼容。。。
好,继续搭建调度中心

在db中跑下sql脚本
db 用个新的 xxl_job

修改配置文件
server.port=8081
spring.datasource.url =
再修改下logback.xml文件
<property name="log.path" value="xxl-job-admin.log"/>

找到 com.xxl.job.admin.XxlJobAdminApplication 跑起来=-=
访问xxl job后台 http://127.0.0.1:8081/
账号密码:admin/123456

调度中心完活,开始搞执行器
随便起一个Spring Boot工程
引入xxl-job依赖,注意我们上文说了,版本要一致哈~
 <dependency>
            <groupId>org.springframework.boot</groupId>
            <artifactId>spring-boot-starter-web</artifactId>
        </dependency>

 <!-- https://mvnrepository.com/artifact/com.xuxueli/xxl-job-core -->
        <dependency>
            <groupId>com.xuxueli</groupId>
            <artifactId>xxl-job-core</artifactId>
            <version>2.1.2</version>
        </dependency>
建一个配置文件 application.yml
server:
  port: 8088 #指定一个端口,避免和 XXL-JOB 调度中心的端口冲突。仅仅测试之用

# xxl-job
xxl:
  job:
    admin:
      addresses: http://172.17.92.213:8081/xxl-job-admin # 调度中心部署跟地址 [选填]:如调度中心集群部署存在多个地址则用逗号分隔。执行器将会使用该地址进行"执行器心跳注册"和"任务结果回调";为空则关闭自动注册;
    executor:
      appname: xinye # 执行器 AppName [选填]:执行器心跳注册分组依据;为空则关闭自动注册
      ip: # 执行器IP [选填]:默认为空表示自动获取IP,多网卡时可手动设置指定IP,该IP不会绑定Host仅作为通讯实用;地址信息用于 "执行器注册" 和 "调度中心请求并触发任务";
      port: 6666 # ### 执行器端口号 [选填]:小于等于0则自动获取;默认端口为9999,单机部署多个执行器时,注意要配置不同执行器端口;
      logpath: /Users/xinye/Documents/job/xxl-job # 执行器运行日志文件存储磁盘路径 [选填] :需要对该路径拥有读写权限;为空则使用默认路径;
      logretentiondays: 30 # 执行器日志文件保存天数 [选填] : 过期日志自动清理, 限制值大于等于3时生效; 否则, 如-1, 关闭自动清理功能;
    accessToken: # 执行器通讯TOKEN [选填]:非空时启用;
定义我们的Job
package pers.wmx.springbootfreemarkerdemo.job;

import java.util.concurrent.atomic.AtomicInteger;

import org.springframework.stereotype.Component;

import com.xxl.job.core.biz.model.ReturnT;
import com.xxl.job.core.handler.IJobHandler;
import com.xxl.job.core.handler.annotation.JobHandler;

import lombok.extern.slf4j.Slf4j;

/**
 * @author wangmingxin03
 * Created on 2021-12-28
 */
@Component
@JobHandler("mySimpleJob")
@Slf4j
public class MySimpleJob extends IJobHandler {
    private final AtomicInteger counter = new AtomicInteger();

    @Override
    public ReturnT<String> execute(String s) throws Exception {
        log.info("MySimpleJob execute:{}", counter.incrementAndGet());
        return ReturnT.SUCCESS;
    }
}
定义xxl job 配置类
package pers.wmx.springbootfreemarkerdemo.job;

import org.springframework.beans.factory.annotation.Value;
import org.springframework.context.annotation.Bean;
import org.springframework.context.annotation.Configuration;

import com.xxl.job.core.executor.impl.XxlJobSpringExecutor;

/**
 * @author wangmingxin03
 * Created on 2021-12-28
 */
@Configuration
public class XxlJobConfiguration {
    @Value("${xxl.job.admin.addresses}")
    private String adminAddresses;
    @Value("${xxl.job.executor.appname}")
    private String appName;
    @Value("${xxl.job.executor.ip}")
    private String ip;
    @Value("${xxl.job.executor.port}")
    private int port;
    @Value("${xxl.job.accessToken}")
    private String accessToken;
    @Value("${xxl.job.executor.logpath}")
    private String logPath;
    @Value("${xxl.job.executor.logretentiondays}")
    private int logRetentionDays;

    @Bean
    public XxlJobSpringExecutor xxlJobSpringExecutor() {
        XxlJobSpringExecutor xxlJobSpringExecutor = new XxlJobSpringExecutor();

        xxlJobSpringExecutor.setAdminAddresses(adminAddresses);
        xxlJobSpringExecutor.setAppName(appName);
        xxlJobSpringExecutor.setIp(ip);
        xxlJobSpringExecutor.setPort(port);
        xxlJobSpringExecutor.setAccessToken(accessToken);
        xxlJobSpringExecutor.setLogPath(logPath);
        xxlJobSpringExecutor.setLogRetentionDays(logRetentionDays);

        return  xxlJobSpringExecutor;
    }

}
把执行器的Spring Boot服务起起来即可
然后就去XXL JOB后台添加执行器,配置任务,起起来


操作任务就可以启动起来了
可以看下执行的日志
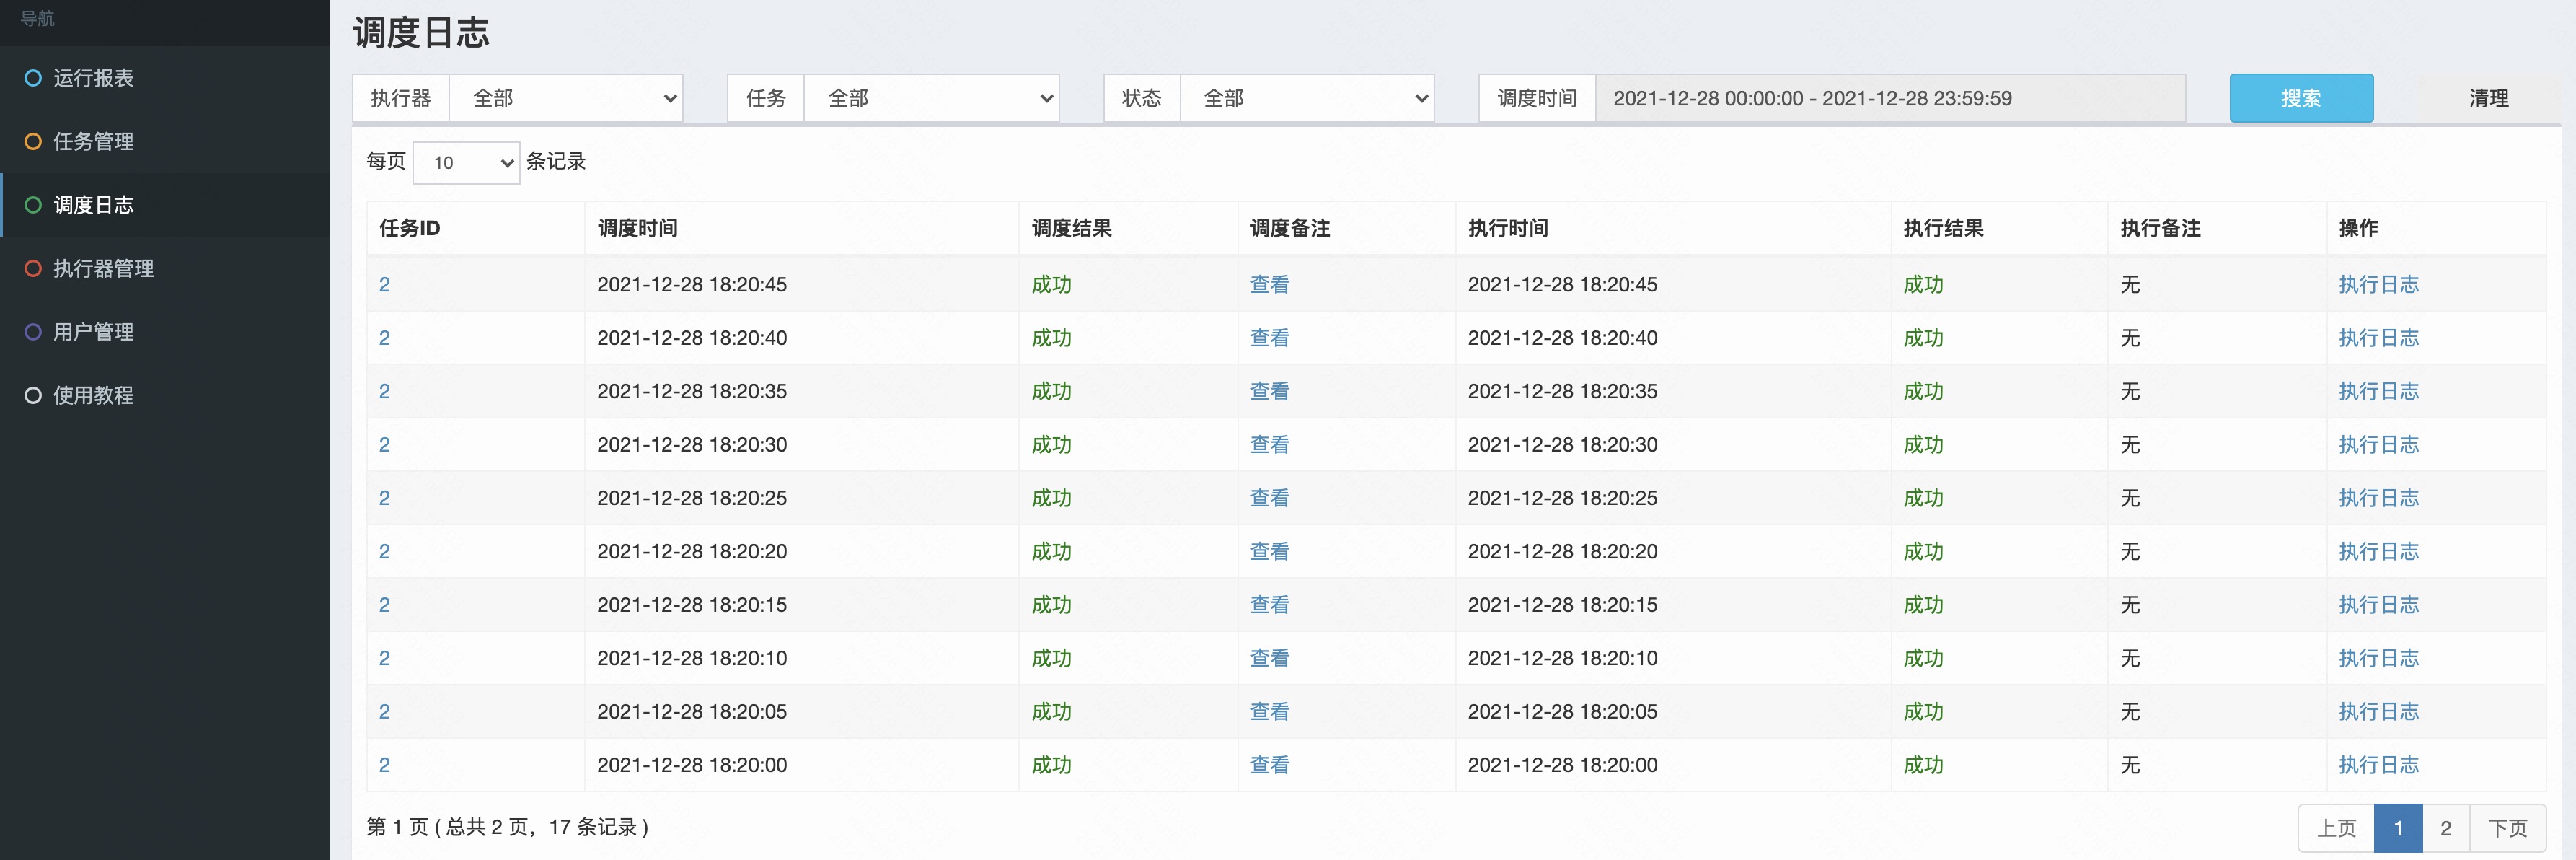
广播任务
SHARDING_BROADCAST(分片广播):广播触发对应集群中所有机器执行一次任务,同时系统自动传递分片参数;可根据分片参数开发分片任务
@Configuration
@JobHandler("shardingSimpleJob")
@Slf4j
public class ShardingSimpleJob extends IJobHandler {
    public ReturnT<String> execute(String param) throws Exception {
        ShardingUtil.ShardingVO shardingVO = ShardingUtil.getShardingVo();
        log.info("分片参数:当前分片序号 = {}, 总分片数 = {}",
                shardingVO.getIndex(), shardingVO.getTotal());

        return ReturnT.SUCCESS;
    }

}
启2个实例
起多个任务执行器实例,指定不同的端口号


看下2个实例的执行日志


其他策略

广播策略 每个节点都会执行,对应的分片index

最后看一种GLUE模式(Java)
任务以源码方式维护在调度中心,支持通过Web IDE在线更新,实时编译和生效,因此不需要指定JobHandler。


GLUE模式(Java)会通过Groovy类加载器加载此代码,实例化成Java对象,执行对应的任务逻辑。
再看下数据库中的一些表
- xxl_job_lock:任务调度锁表;
- xxl_job_group:执行器信息表,维护任务执行器信息;
- xxl_job_info:调度扩展信息表: 用于保存XXL-JOB调度任务的扩展信息,如任务分组、任务名、机器地址、执行器、执行入参和报警邮件等等;
- xxl_job_log:调度日志表: 用于保存XXL-JOB任务调度的历史信息,如调度结果、执行结果、调度入参、调度机器和执行器等等;
- xxl_job_log_report:调度日志报表:用户存储XXL-JOB任务调度日志的报表,调度中心报表功能页面会用到;
- xxl_job_logglue:任务GLUE日志:用于保存GLUE更新历史,用于支持GLUE的版本回溯功能;
- xxl_job_registry:执行器注册表,维护在线的执行器和调度中心机器地址信息;
- xxl_job_user:系统用户表;
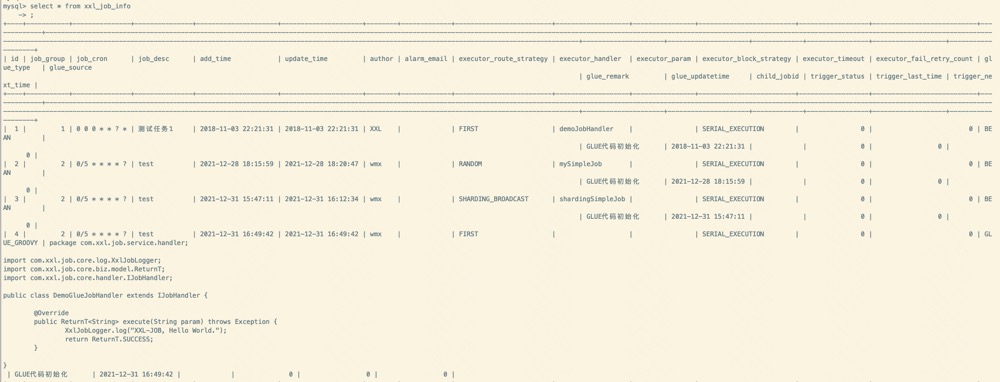


最后看下原理和设计的一些东西

XXL JOB是个中心化的分片任务调度框架,有调度中心和执行器的概念,解耦了任务的调度和执行。
如上面我们的例子所见,XXL JOB的后台还是很不错的,功能比较完善, UI也挺不赖,可以随时启停任务。
任务执行流程

代码入口 XxlJobAdminConfig 注入
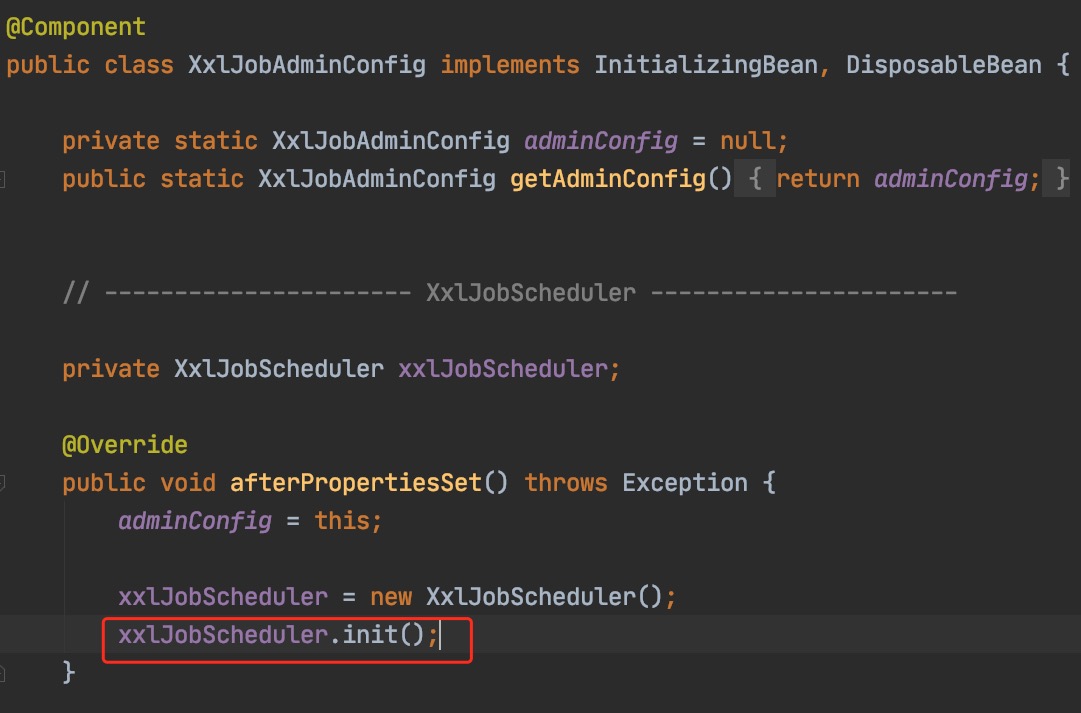
触发com.xxl.job.admin.core.scheduler.XxlJobScheduler#init
com.xxl.job.admin.core.thread.JobScheduleHelper#start
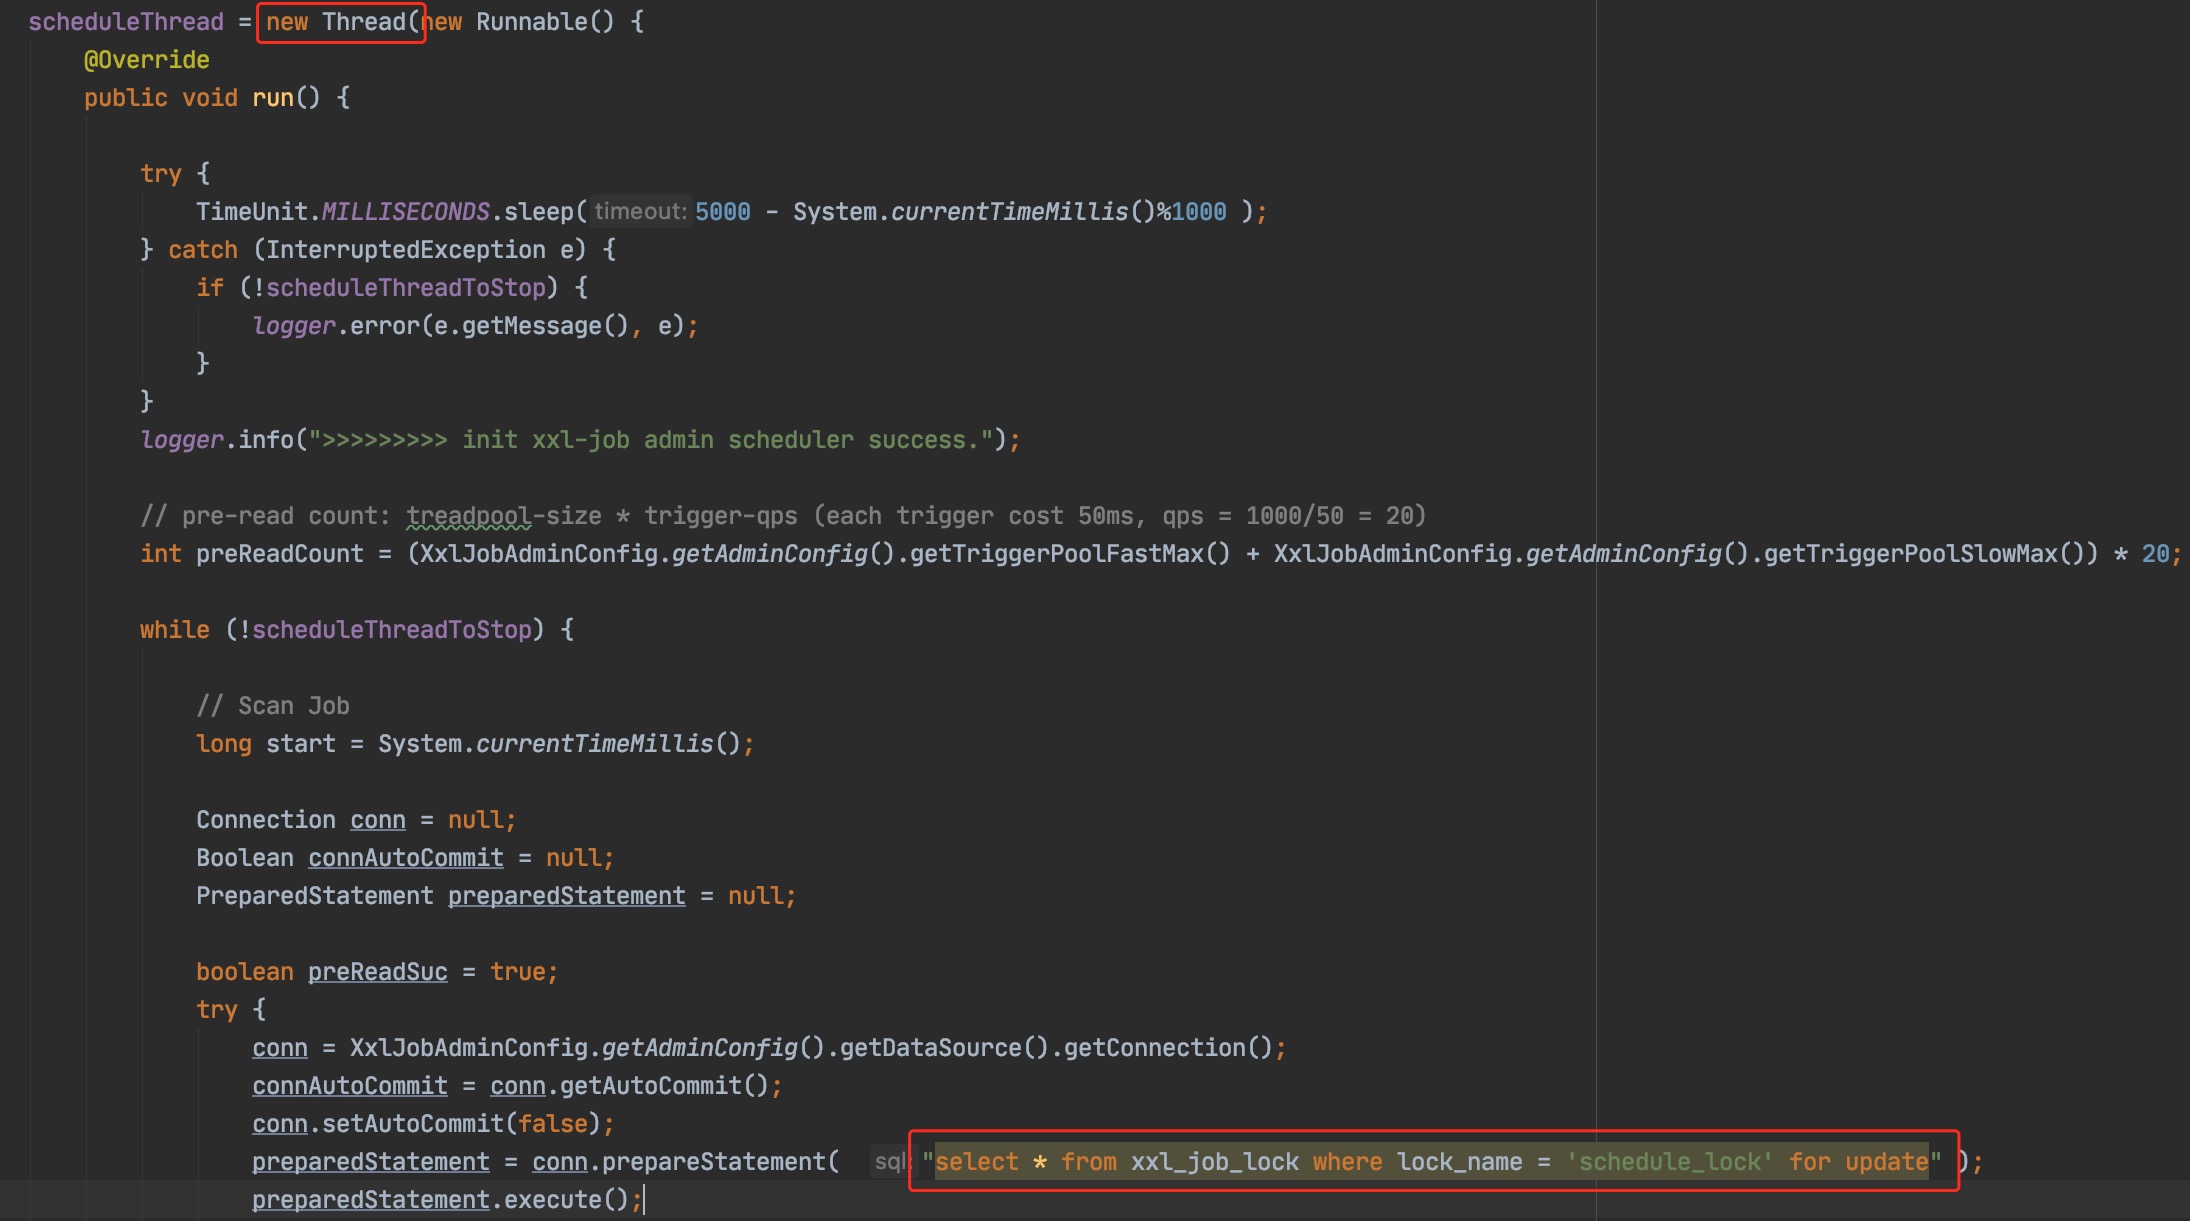
这里会起个线程搞事情
并且会加锁,保证调度中心只有一个实例执行
然后会拿到任务列表,遍历依次调度
List<XxlJobInfo> scheduleList = XxlJobAdminConfig.getAdminConfig().getXxlJobInfoDao().scheduleJobQuery(nowTime + PRE_READ_MS, preReadCount);
com.xxl.job.admin.core.thread.JobTriggerPoolHelper#trigger
com.xxl.job.admin.core.thread.JobTriggerPoolHelper#addTrigger
com.xxl.job.admin.core.trigger.XxlJobTrigger#trigger
com.xxl.job.admin.core.trigger.XxlJobTrigger#processTrigger
com.xxl.job.admin.core.trigger.XxlJobTrigger#runExecutor
public interface ExecutorBiz {

    /**
     * beat
     * @return
     */
    public ReturnT<String> beat();

    /**
     * idle beat
     *
     * @param jobId
     * @return
     */
    public ReturnT<String> idleBeat(int jobId);

    /**
     * kill
     * @param jobId
     * @return
     */
    public ReturnT<String> kill(int jobId);

    /**
     * log
     * @param logDateTim
     * @param logId
     * @param fromLineNum
     * @return
     */
    public ReturnT<LogResult> log(long logDateTim, long logId, int fromLineNum);

    /**
     * run
     * @param triggerParam
     * @return
     */
    public ReturnT<String> run(TriggerParam triggerParam);

}
com.xxl.job.core.biz.impl.ExecutorBizImpl#run
跑任务的时候,每个任务会对应一个线程,对应关系会存在一个Map里
private static ConcurrentMap<Integer, JobThread> jobThreadRepository = new ConcurrentHashMap<Integer, JobThread>();
任务的运行模式
public enum GlueTypeEnum {

    BEAN("BEAN", false, null, null),
    GLUE_GROOVY("GLUE(Java)", false, null, null),
    GLUE_SHELL("GLUE(Shell)", true, "bash", ".sh"),
    GLUE_PYTHON("GLUE(Python)", true, "python", ".py"),
    GLUE_PHP("GLUE(PHP)", true, "php", ".php"),
    GLUE_NODEJS("GLUE(Nodejs)", true, "node", ".js"),
    GLUE_POWERSHELL("GLUE(PowerShell)", true, "powershell", ".ps1");

    private String desc;
    private boolean isScript;
    private String cmd;
    private String suffix;
路由策略
public enum ExecutorRouteStrategyEnum {

    FIRST(I18nUtil.getString("jobconf_route_first"), new ExecutorRouteFirst()),
    LAST(I18nUtil.getString("jobconf_route_last"), new ExecutorRouteLast()),
    ROUND(I18nUtil.getString("jobconf_route_round"), new ExecutorRouteRound()),
    RANDOM(I18nUtil.getString("jobconf_route_random"), new ExecutorRouteRandom()),
    CONSISTENT_HASH(I18nUtil.getString("jobconf_route_consistenthash"), new ExecutorRouteConsistentHash()),
    LEAST_FREQUENTLY_USED(I18nUtil.getString("jobconf_route_lfu"), new ExecutorRouteLFU()),
    LEAST_RECENTLY_USED(I18nUtil.getString("jobconf_route_lru"), new ExecutorRouteLRU()),
    FAILOVER(I18nUtil.getString("jobconf_route_failover"), new ExecutorRouteFailover()),
    BUSYOVER(I18nUtil.getString("jobconf_route_busyover"), new ExecutorRouteBusyover()),
    SHARDING_BROADCAST(I18nUtil.getString("jobconf_route_shard"), null);
@Override
    public ReturnT<String> run(TriggerParam triggerParam) {
        // load old:jobHandler + jobThread
        JobThread jobThread = XxlJobExecutor.loadJobThread(triggerParam.getJobId());
        IJobHandler jobHandler = jobThread!=null?jobThread.getHandler():null;
        String removeOldReason = null;

        // valid:jobHandler + jobThread
        GlueTypeEnum glueTypeEnum = GlueTypeEnum.match(triggerParam.getGlueType());

        // 关注 Bean模式
        if (GlueTypeEnum.BEAN == glueTypeEnum) {

            // new jobhandler
            IJobHandler newJobHandler = XxlJobExecutor.loadJobHandler(triggerParam.getExecutorHandler());

            // valid old jobThread
            if (jobThread!=null && jobHandler != newJobHandler) {
                // change handler, need kill old thread
                removeOldReason = "change jobhandler or glue type, and terminate the old job thread.";

                jobThread = null;
                jobHandler = null;
            }

            // valid handler
            if (jobHandler == null) {
                jobHandler = newJobHandler;
                if (jobHandler == null) {
                    return new ReturnT<String>(ReturnT.FAIL_CODE, "job handler [" + triggerParam.getExecutorHandler() + "] not found.");
                }
            }

        }

        // 。。。。。。

        // executor block strategy
        if (jobThread != null) {
            ExecutorBlockStrategyEnum blockStrategy = ExecutorBlockStrategyEnum.match(triggerParam.getExecutorBlockStrategy(), null);
            if (ExecutorBlockStrategyEnum.DISCARD_LATER == blockStrategy) {
                // discard when running
                if (jobThread.isRunningOrHasQueue()) {
                    return new ReturnT<String>(ReturnT.FAIL_CODE, "block strategy effect:"+ExecutorBlockStrategyEnum.DISCARD_LATER.getTitle());
                }
            } else if (ExecutorBlockStrategyEnum.COVER_EARLY == blockStrategy) {
                // kill running jobThread
                if (jobThread.isRunningOrHasQueue()) {
                    removeOldReason = "block strategy effect:" + ExecutorBlockStrategyEnum.COVER_EARLY.getTitle();

                    jobThread = null;
                }
            } else {
                // just queue trigger
            }
        }

        // replace thread (new or exists invalid)
        if (jobThread == null) {
            jobThread = XxlJobExecutor.registJobThread(triggerParam.getJobId(), jobHandler, removeOldReason);
        }

        // push data to queue
        ReturnT<String> pushResult = jobThread.pushTriggerQueue(triggerParam);
        return pushResult;
    }
在第一次注册这个线程时,就会启动
public static JobThread registJobThread(int jobId, IJobHandler handler, String removeOldReason){
        JobThread newJobThread = new JobThread(jobId, handler);
        newJobThread.start();
        logger.info(">>>>>>>>>>> xxl-job regist JobThread success, jobId:{}, handler:{}", new Object[]{jobId, handler});

        JobThread oldJobThread = jobThreadRepository.put(jobId, newJobThread);  // putIfAbsent | oh my god, map's put method return the old value!!!
        if (oldJobThread != null) {
            oldJobThread.toStop(removeOldReason);
            oldJobThread.interrupt();
        }

        return newJobThread;
    }
pushTriggerQueue
public ReturnT<String> pushTriggerQueue(TriggerParam triggerParam) {
        // avoid repeat
        if (triggerLogIdSet.contains(triggerParam.getLogId())) {
            logger.info(">>>>>>>>>>> repeate trigger job, logId:{}", triggerParam.getLogId());
            return new ReturnT<String>(ReturnT.FAIL_CODE, "repeate trigger job, logId:" + triggerParam.getLogId());
        }

        triggerLogIdSet.add(triggerParam.getLogId());
        triggerQueue.add(triggerParam);
        return ReturnT.SUCCESS;
    }
扔到一个Queue里
   private LinkedBlockingQueue<TriggerParam> triggerQueue;

//。。。

public JobThread(int jobId, IJobHandler handler) {
        this.jobId = jobId;
        this.handler = handler;
        this.triggerQueue = new LinkedBlockingQueue<TriggerParam>();
        this.triggerLogIdSet = Collections.synchronizedSet(new HashSet<Long>());
    }
我们再回头看下线程启动的方法

会不停的从队列里取出任务执行
尴尬了,debug的时候,发现这块都没有走到。。。
从下面这块代码重新看
 public static ReturnT<String> runExecutor(TriggerParam triggerParam, String address){
        ReturnT<String> runResult = null;
        try {
            ExecutorBiz executorBiz = XxlJobScheduler.getExecutorBiz(address);
            runResult = executorBiz.run(triggerParam);
        } catch (Exception e) {
            logger.error(">>>>>>>>>>> xxl-job trigger error, please check if the executor[{}] is running.", address, e);
            runResult = new ReturnT<String>(ReturnT.FAIL_CODE, ThrowableUtil.toString(e));
        }

        StringBuffer runResultSB = new StringBuffer(I18nUtil.getString("jobconf_trigger_run") + ":");
        runResultSB.append("<br>address:").append(address);
        runResultSB.append("<br>code:").append(runResult.getCode());
        runResultSB.append("<br>msg:").append(runResult.getMsg());

        runResult.setMsg(runResultSB.toString());
        return runResult;
    }
getExecutorBiz 看漏了这个方法 实际上没有走到 ExecutorBizImpl (这个是执行器走到的 =-=),而是走到了代理
 public static ExecutorBiz getExecutorBiz(String address) throws Exception {
        // valid
        if (address==null || address.trim().length()==0) {
            return null;
        }

        // load-cache
        address = address.trim();
        ExecutorBiz executorBiz = executorBizRepository.get(address);
        if (executorBiz != null) {
            return executorBiz;
        }

        // set-cache
        XxlRpcReferenceBean referenceBean = new XxlRpcReferenceBean();
        referenceBean.setClient(NettyHttpClient.class);
        referenceBean.setSerializer(HessianSerializer.class);
        referenceBean.setCallType(CallType.SYNC);
        referenceBean.setLoadBalance(LoadBalance.ROUND);
        referenceBean.setIface(ExecutorBiz.class);
        referenceBean.setVersion(null);
        referenceBean.setTimeout(3000);
        referenceBean.setAddress(address);
        referenceBean.setAccessToken(XxlJobAdminConfig.getAdminConfig().getAccessToken());
        referenceBean.setInvokeCallback(null);
        referenceBean.setInvokerFactory(null);

        executorBiz = (ExecutorBiz) referenceBean.getObject();

        executorBizRepository.put(address, executorBiz);
        return executorBiz;
    }
这里是整了个rpc代理对象
底层用了xxl job自己实现的RPC

可以看到RPC 请求地址的负载均衡 loadbalance
RPC 请求体的组装
然后就是发起RPC调用,请求执行器
// send
if (CallType.SYNC == callType) {
    // future-response set
    XxlRpcFutureResponse futureResponse = new XxlRpcFutureResponse(invokerFactory, xxlRpcRequest, null);
    try {
        // do invoke
        clientInstance.asyncSend(finalAddress, xxlRpcRequest);

        // future get
        XxlRpcResponse xxlRpcResponse = futureResponse.get(timeout, TimeUnit.MILLISECONDS);
        if (xxlRpcResponse.getErrorMsg() != null) {
            throw new XxlRpcException(xxlRpcResponse.getErrorMsg());
        }
        return xxlRpcResponse.getResult();
    } catch (Exception e) {
        logger.info(">>>>>>>>>>> xxl-rpc, invoke error, address:{}, XxlRpcRequest{}", finalAddress, xxlRpcRequest);

        throw (e instanceof XxlRpcException)?e:new XxlRpcException(e);
    } finally{
        // future-response remove
        futureResponse.removeInvokerFuture();
    }
} else if (CallType.FUTURE == callType) {
    // future-response set
    XxlRpcFutureResponse futureResponse = new XxlRpcFutureResponse(invokerFactory, xxlRpcRequest, null);
    try {
        // invoke future set
        XxlRpcInvokeFuture invokeFuture = new XxlRpcInvokeFuture(futureResponse);
        XxlRpcInvokeFuture.setFuture(invokeFuture);

        // do invoke
        clientInstance.asyncSend(finalAddress, xxlRpcRequest);

        return null;
    } catch (Exception e) {
        logger.info(">>>>>>>>>>> xxl-rpc, invoke error, address:{}, XxlRpcRequest{}", finalAddress, xxlRpcRequest);

        // future-response remove
        futureResponse.removeInvokerFuture();

        throw (e instanceof XxlRpcException)?e:new XxlRpcException(e);
    }

} else if (CallType.CALLBACK == callType) {

    // get callback
    XxlRpcInvokeCallback finalInvokeCallback = invokeCallback;
    XxlRpcInvokeCallback threadInvokeCallback = XxlRpcInvokeCallback.getCallback();
    if (threadInvokeCallback != null) {
        finalInvokeCallback = threadInvokeCallback;
    }
    if (finalInvokeCallback == null) {
        throw new XxlRpcException("xxl-rpc XxlRpcInvokeCallback(CallType="+ CallType.CALLBACK.name() +") cannot be null.");
    }

    // future-response set
    XxlRpcFutureResponse futureResponse = new XxlRpcFutureResponse(invokerFactory, xxlRpcRequest, finalInvokeCallback);
    try {
        clientInstance.asyncSend(finalAddress, xxlRpcRequest);
    } catch (Exception e) {
        logger.info(">>>>>>>>>>> xxl-rpc, invoke error, address:{}, XxlRpcRequest{}", finalAddress, xxlRpcRequest);

        // future-response remove
        futureResponse.removeInvokerFuture();

        throw (e instanceof XxlRpcException)?e:new XxlRpcException(e);
    }

    return null;
} else if (CallType.ONEWAY == callType) {
    clientInstance.asyncSend(finalAddress, xxlRpcRequest);
    return null;
} else {
    throw new XxlRpcException("xxl-rpc callType["+ callType +"] invalid");
}

rpc client 的 init 是发生在 com.xxl.rpc.remoting.net.common.ConnectClient#getPool
里面起了netty
 @Override
    public void init(String address, final Serializer serializer, final XxlRpcInvokerFactory xxlRpcInvokerFactory) throws Exception {
        final NettyHttpConnectClient thisClient = this;

        if (!address.toLowerCase().startsWith("http")) {
            address = "http://" + address;  // IP:PORT, need parse to url
        }

        this.address = address;
        URL url = new URL(address);
        this.host = url.getHost();
        int port = url.getPort()>-1?url.getPort():80;


        this.group = new NioEventLoopGroup();
        Bootstrap bootstrap = new Bootstrap();
        bootstrap.group(group)
                .channel(NioSocketChannel.class)
                .handler(new ChannelInitializer<SocketChannel>() {
                    @Override
                    public void initChannel(SocketChannel channel) throws Exception {
                        channel.pipeline()
                                .addLast(new IdleStateHandler(0,0, Beat.BEAT_INTERVAL, TimeUnit.SECONDS))   // beat N, close if fail
                                .addLast(new HttpClientCodec())
                                .addLast(new HttpObjectAggregator(5*1024*1024))
                                .addLast(new NettyHttpClientHandler(xxlRpcInvokerFactory, serializer, thisClient));
                    }
                })
                .option(ChannelOption.SO_KEEPALIVE, true)
                .option(ChannelOption.CONNECT_TIMEOUT_MILLIS, 10000);
        this.channel = bootstrap.connect(host, port).sync().channel();

        this.serializer = serializer;

        // valid
        if (!isValidate()) {
            close();
            return;
        }

        logger.debug(">>>>>>>>>>> xxl-rpc netty client proxy, connect to server success at host:{}, port:{}", host, port);
    }
@Override
    public void send(XxlRpcRequest xxlRpcRequest) throws Exception {
        byte[] requestBytes = serializer.serialize(xxlRpcRequest);

        DefaultFullHttpRequest request = new DefaultFullHttpRequest(HttpVersion.HTTP_1_1, HttpMethod.POST, new URI(address).getRawPath(), Unpooled.wrappedBuffer(requestBytes));
        request.headers().set(HttpHeaderNames.HOST, host);
        request.headers().set(HttpHeaderNames.CONNECTION, HttpHeaderValues.KEEP_ALIVE);
        request.headers().set(HttpHeaderNames.CONTENT_LENGTH, request.content().readableBytes());

        this.channel.writeAndFlush(request).sync();
    }
真正发起调用就是往netty扔请求 this.channel.writeAndFlush(request).sync()

慢慢一步步调试还是能看懂一部分。。。
调度器我们看了一部分,再瞅下执行器
执行器启动会往调度中心注册,并落db, 调度中心还会起线程对执行器进行探活,推拉结合~
XXL JOB对 Spring的使用比较牛逼哇
先看个 XxlJobSpringExecutor
public class XxlJobSpringExecutor extends XxlJobExecutor implements ApplicationContextAware, InitializingBean, DisposableBean {


    // start
    @Override
    public void afterPropertiesSet() throws Exception {

        // init JobHandler Repository
        initJobHandlerRepository(applicationContext);

        // init JobHandler Repository (for method)
        initJobHandlerMethodRepository(applicationContext);

        // refresh GlueFactory
        GlueFactory.refreshInstance(1);

        // super start
        super.start();
    }

   // 。。。
initJobHandlerRepository
初始化job handler

找到JobHandler注解的类,我们有2
遍历注册到本地的map里
private static ConcurrentMap<String, IJobHandler> jobHandlerRepository = new ConcurrentHashMap<String, IJobHandler>();
    public static IJobHandler registJobHandler(String name, IJobHandler jobHandler){
        logger.info(">>>>>>>>>>> xxl-job register jobhandler success, name:{}, jobHandler:{}", name, jobHandler);
        return jobHandlerRepository.put(name, jobHandler);
    }
    public static IJobHandler loadJobHandler(String name){
        return jobHandlerRepository.get(name);
    }
再看下下面这个,初始化handler的执行方法
initJobHandlerMethodRepository
XxlJob xxlJob = AnnotationUtils.findAnnotation(method, XxlJob.class);会找到 XxlJob 注解的方法
其实2个都是初始化handler,一种是类的方式 JobHandler 注解,一种方法的方式 XxlJob 注解,都阔以,
但是不清楚为啥JobHandler注解 标注过期了,官方推荐使用XxlJob注解
初始化注册完handler,开始真正起起来了
com.xxl.job.core.executor.XxlJobExecutor#start
public void start() throws Exception {

        // init logpath  初始化日志路径
        XxlJobFileAppender.initLogPath(logPath);

        // init invoker, admin-client  初始化调度器客户端
        initAdminBizList(adminAddresses, accessToken);


        // init JobLogFileCleanThread  初始化日志清理线程
        JobLogFileCleanThread.getInstance().start(logRetentionDays);

        // init TriggerCallbackThread   初始化回调线程
        TriggerCallbackThread.getInstance().start();

        // init executor-server  初始化执行器服务
        port = port>0?port: NetUtil.findAvailablePort(9999);
        ip = (ip!=null&&ip.trim().length()>0)?ip: IpUtil.getIp();
        initRpcProvider(ip, port, appName, accessToken);
    }
主要关注下 initRpcProvider
上面我们在demo中完成了执行器一些属性的注入,再这里就会用到了
比如执行器ip,port
@Configuration
public class XxlJobConfiguration {
    @Value("${xxl.job.admin.addresses}")
    private String adminAddresses;
    @Value("${xxl.job.executor.appname}")
    private String appName;
    @Value("${xxl.job.executor.ip}")
    private String ip;
    @Value("${xxl.job.executor.port}")
    private int port;
    @Value("${xxl.job.accessToken}")
    private String accessToken;
    @Value("${xxl.job.executor.logpath}")
    private String logPath;
    @Value("${xxl.job.executor.logretentiondays}")
    private int logRetentionDays;

    @Bean
    public XxlJobSpringExecutor xxlJobSpringExecutor() {
        XxlJobSpringExecutor xxlJobSpringExecutor = new XxlJobSpringExecutor();

        xxlJobSpringExecutor.setAdminAddresses(adminAddresses);
        xxlJobSpringExecutor.setAppName(appName);
        xxlJobSpringExecutor.setIp(ip);
        xxlJobSpringExecutor.setPort(port);
        xxlJobSpringExecutor.setAccessToken(accessToken);
        xxlJobSpringExecutor.setLogPath(logPath);
        xxlJobSpringExecutor.setLogRetentionDays(logRetentionDays);

        return  xxlJobSpringExecutor;
    }

}
private void initRpcProvider(String ip, int port, String appName, String accessToken) throws Exception {

        // init, provider factory
        String address = IpUtil.getIpPort(ip, port);
        Map<String, String> serviceRegistryParam = new HashMap<String, String>();
        serviceRegistryParam.put("appName", appName);
        serviceRegistryParam.put("address", address);

        xxlRpcProviderFactory = new XxlRpcProviderFactory();

        xxlRpcProviderFactory.setServer(NettyHttpServer.class);
        xxlRpcProviderFactory.setSerializer(HessianSerializer.class);
        xxlRpcProviderFactory.setCorePoolSize(20);
        xxlRpcProviderFactory.setMaxPoolSize(200);
        xxlRpcProviderFactory.setIp(ip);
        xxlRpcProviderFactory.setPort(port);
        xxlRpcProviderFactory.setAccessToken(accessToken);
        xxlRpcProviderFactory.setServiceRegistry(ExecutorServiceRegistry.class);
        xxlRpcProviderFactory.setServiceRegistryParam(serviceRegistryParam);

        // add services
        xxlRpcProviderFactory.addService(ExecutorBiz.class.getName(), null, new ExecutorBizImpl());

        // start
        xxlRpcProviderFactory.start();

    }
public void start() throws Exception {

    // 。。。 一些校验

    // init serializerInstance
    this.serializerInstance = serializer.newInstance();

    // start server
    serviceAddress = IpUtil.getIpPort(this.ip, port);
    serverInstance = server.newInstance();

    serverInstance.setStartedCallback(new BaseCallback() {      // serviceRegistry started
        @Override
        public void run() throws Exception {
            // start registry
            if (serviceRegistry != null) {
                serviceRegistryInstance = serviceRegistry.newInstance();
                serviceRegistryInstance.start(serviceRegistryParam);
                if (serviceData.size() > 0) {
                    serviceRegistryInstance.registry(serviceData.keySet(), serviceAddress);
                }
            }
        }
    });

    serverInstance.setStopedCallback(new BaseCallback() {       // serviceRegistry stoped
        @Override
        public void run() {
            // stop registry
            if (serviceRegistryInstance != null) {
                if (serviceData.size() > 0) {
                    serviceRegistryInstance.remove(serviceData.keySet(), serviceAddress);
                }
                serviceRegistryInstance.stop();
                serviceRegistryInstance = null;
            }
        }
    });

    serverInstance.start(this);
}
设置了2回调方法
public abstract class Server {
    protected static final Logger logger = LoggerFactory.getLogger(Server.class);


    private BaseCallback startedCallback;
    private BaseCallback stopedCallback;

    public void setStartedCallback(BaseCallback startedCallback) {
        this.startedCallback = startedCallback;
    }

    public void setStopedCallback(BaseCallback stopedCallback) {
        this.stopedCallback = stopedCallback;
    }


    /**
     * start server
     *
     * @param xxlRpcProviderFactory
     * @throws Exception
     */
    public abstract void start(final XxlRpcProviderFactory xxlRpcProviderFactory) throws Exception;
调用 com.xxl.rpc.remoting.net.impl.netty_http.server.NettyHttpServer#start
@Override
    public void start(final XxlRpcProviderFactory xxlRpcProviderFactory) throws Exception {

        thread = new Thread(new Runnable() {

            @Override
            public void run() {

                // param
                final ThreadPoolExecutor serverHandlerPool = ThreadPoolUtil.makeServerThreadPool(
                        NettyHttpServer.class.getSimpleName(),
                        xxlRpcProviderFactory.getCorePoolSize(),
                        xxlRpcProviderFactory.getMaxPoolSize());
                EventLoopGroup bossGroup = new NioEventLoopGroup();
                EventLoopGroup workerGroup = new NioEventLoopGroup();

                try {
                    // start server
                    ServerBootstrap bootstrap = new ServerBootstrap();
                    bootstrap.group(bossGroup, workerGroup)
                            .channel(NioServerSocketChannel.class)
                            .childHandler(new ChannelInitializer<SocketChannel>() {
                                @Override
                                public void initChannel(SocketChannel channel) throws Exception {
                                    channel.pipeline()
                                            .addLast(new IdleStateHandler(0, 0, Beat.BEAT_INTERVAL * 3, TimeUnit.SECONDS))  // beat 3N, close if idle
                                            .addLast(new HttpServerCodec())
                                            .addLast(new HttpObjectAggregator(5 * 1024 * 1024))  // merge request & reponse to FULL
                                            .addLast(new NettyHttpServerHandler(xxlRpcProviderFactory, serverHandlerPool));
                                }
                            })
                            .childOption(ChannelOption.SO_KEEPALIVE, true);

                    // bind
                    ChannelFuture future = bootstrap.bind(xxlRpcProviderFactory.getPort()).sync();

                    logger.info(">>>>>>>>>>> xxl-rpc remoting server start success, nettype = {}, port = {}", NettyHttpServer.class.getName(), xxlRpcProviderFactory.getPort());
                    onStarted();

                    // wait util stop
                    future.channel().closeFuture().sync();

                } catch (InterruptedException e) {
                    if (e instanceof InterruptedException) {
                        logger.info(">>>>>>>>>>> xxl-rpc remoting server stop.");
                    } else {
                        logger.error(">>>>>>>>>>> xxl-rpc remoting server error.", e);
                    }
                } finally {

                    // stop
                    try {
                        serverHandlerPool.shutdown();   // shutdownNow
                    } catch (Exception e) {
                        logger.error(e.getMessage(), e);
                    }
                    try {
                        workerGroup.shutdownGracefully();
                        bossGroup.shutdownGracefully();
                    } catch (Exception e) {
                        logger.error(e.getMessage(), e);
                    }
                }

            }

        });
        thread.setDaemon(true); // daemon, service jvm, user thread leave >>> daemon leave >>> jvm leave
        thread.start();
    }
执行器的netty起起来,跑起来跑起来~
启动成功后
onStarted() 会回调 startedCallback
发起向调度中心的任务注册
com.xxl.job.core.executor.XxlJobExecutor.ExecutorServiceRegistry
com.xxl.job.core.thread.ExecutorRegistryThread#start
起一个线程往调度中心捅API 注册任务
 @Override
    public ReturnT<String> registry(RegistryParam registryParam) {
        return XxlJobRemotingUtil.postBody(addressUrl + "api/registry", accessToken, registryParam, 3);
    }
调度中心对应的API

就是数据落下DB
执行器netty服务使用的 com.xxl.rpc.remoting.net.impl.netty_http.server.NettyHttpServerHandler
会处理调度中心的请求
 @Override
    protected void channelRead0(final ChannelHandlerContext ctx, FullHttpRequest msg) throws Exception {

        // request parse
        final byte[] requestBytes = ByteBufUtil.getBytes(msg.content());    // byteBuf.toString(io.netty.util.CharsetUtil.UTF_8);
        final String uri = msg.uri();
        final boolean keepAlive = HttpUtil.isKeepAlive(msg);

        // do invoke
        serverHandlerPool.execute(new Runnable() {
            @Override
            public void run() {
                process(ctx, uri, requestBytes, keepAlive);
            }
        });
    }
先到这里,有点小累。。。
转载请注明:汪明鑫的个人博客 » XXL JOB 初步学习


说点什么
您将是第一位评论人!