目录
redis下载
把官网的这个先粘过来…
Installation
Download, extract and compile Redis with:
$ wget http://download.redis.io/releases/redis-5.0.5.tar.gz
$ tar xzf redis-5.0.5.tar.gz
$ cd redis-5.0.5
$ make
The binaries that are now compiled are available in the
srcdirectory. Run Redis with:$ src/redis-serverYou can interact with Redis using the built-in client:
$ src/redis-cli
redis> set foo bar
OK
redis> get foo
"bar"
[root@xinyeshuaiqi ~]# wget http://download.redis.io/releases/redis-4.0.14.tar.gz
–2019-10-29 12:22:25– http://download.redis.io/releases/redis-4.0.14.tar.gz
Resolving download.redis.io (download.redis.io)… 109.74.203.151
Connecting to download.redis.io (download.redis.io)|109.74.203.151|:80… connected.
HTTP request sent, awaiting response… 200 OK
Length: 1740967 (1.7M) [application/x-gzip]
Saving to: ‘redis-4.0.14.tar.gz’
redis安装与启动
我直接用的 redis-3.2.12
得到压缩包,tar -zxvf 进行解压
然后进入解压后的目录
进行redis源码编译并指定安装目录
[root@xinyeshuaiqi ~]# mkdir myRedis

[root@xinyeshuaiqi myRedis]# mkdir 638{1,2,3}

[root@xinyeshuaiqi myRedis]# cd 6381 6381、6382、6383是我为后续redis主从集群创建的目录,先不管
redis-server --port 6381 是启动redis且指定端口6381
[root@xinyeshuaiqi 6381]# redis-server --port 6381
                _._
           _.-``__ ''-._
      _.-``    `.  `_.  ''-._           Redis 3.2.12 (00000000/0) 64 bit
  .-`` .-```.  ```\/    _.,_ ''-._
 (    '      ,       .-`  | `,    )     Running in standalone mode
 |`-._`-...-` __...-.``-._|'` _.-'|     Port: 6381
 |    `-._   `._    /     _.-'    |     PID: 1350
  `-._    `-._  `-./  _.-'    _.-'
 |`-._`-._    `-.__.-'    _.-'_.-'|
 |    `-._`-._        _.-'_.-'    |           http://redis.io
  `-._    `-._`-.__.-'_.-'    _.-'
 |`-._`-._    `-.__.-'    _.-'_.-'|
 |    `-._`-._        _.-'_.-'    |
  `-._    `-._`-.__.-'_.-'    _.-'
      `-._    `-.__.-'    _.-'
          `-._        _.-'
              `-.__.-'

1350:M 29 Oct 12:26:08.876 # WARNING: The TCP backlog setting of 511 cannot be enforced because /proc/sys/net/core/somaxconn is set to the lower value of 128.
1350:M 29 Oct 12:26:08.876 # Server started, Redis version 3.2.12
1350:M 29 Oct 12:26:08.876 # WARNING overcommit_memory is set to 0! Background save may fail under low memory condition. To fix this issue add 'vm.overcommit_memory = 1' to /etc/sysctl.conf and then reboot or run the command 'sysctl vm.overcommit_memory=1' for this to take effect.
1350:M 29 Oct 12:26:08.876 # WARNING you have Transparent Huge Pages (THP) support enabled in your kernel. This will create latency and memory usage issues with Redis. To fix this issue run the command 'echo never > /sys/kernel/mm/transparent_hugepage/enabled' as root, and add it to your /etc/rc.local in order to retain the setting after a reboot. Redis must be restarted after THP is disabled.
1350:M 29 Oct 12:26:08.876 * The server is now ready to accept connections on port 6381
设置后台运行
但默认后台进程是阻塞形式的
我们需要去配置redis以后台形式运行
修改redis.config (/root/redis/redis.config)

redis客户端
redis-cli -p 端口号 (指定连接的port)
关闭redis
我们把刚才启动的redis server全关掉
优雅关闭:redis-cli shutdown (有时候不好使)
粗鲁关闭:
[root@xinyeshuaiqi 6381]# ps -ef | grep redis
root      1350     1  0 12:26 ?        00:00:03 redis-server *:6381
root      4142     1  0 13:19 ?        00:00:02 redis-server *:6382
root      8060  6728  0 14:31 pts/3    00:00:00 grep --color=auto redis
[root@xinyeshuaiqi 6381]# kill -9 1350
[root@xinyeshuaiqi 6381]# ps -ef | grep redis
root      4142     1  0 13:19 ?        00:00:02 redis-server *:6382
root      8111  6728  0 14:32 pts/3    00:00:00 grep --color=auto redis
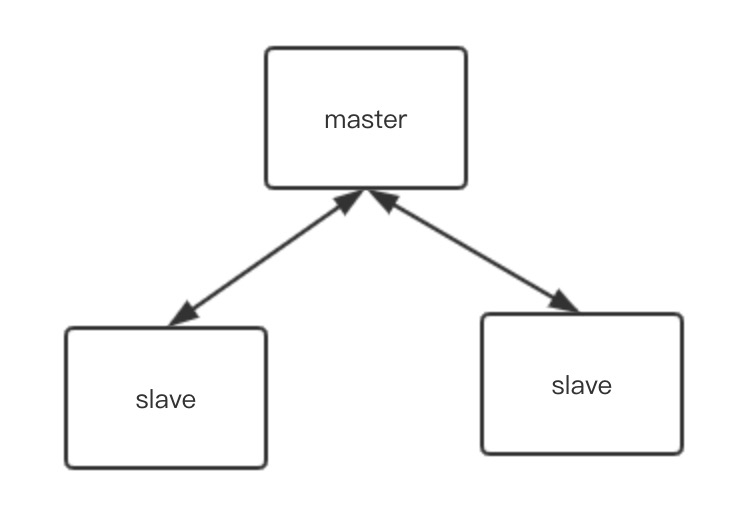
redis主从集群
依然进入上面我们创建的6381目录
redis-server /root/redis/redis.conf --port 6381
端口号为6381
进入6382目录
redis-server /root/redis/redis.conf --port 6382 --slaveof 127.0.0.1 6381
启动另一个redis实例指定为6381的从,端口号为6382
进入6383目录
redis-server /root/redis/redis.conf --port 6383 --slaveof 127.0.0.1 6381
启动另一个redis实例指定为6381的从,端口号为6383
[root@xinyeshuaiqi 6383]# ps -ef | grep redis
root      8407     1  0 14:38 ?        00:00:00 redis-server *:6381
root      8730     1  0 14:44 ?        00:00:00 redis-server *:6382
root      8742     1  0 14:44 ?        00:00:00 redis-server *:6383
root      8792  6728  0 14:45 pts/3    00:00:00 grep --color=auto redis
[root@xinyeshuaiqi 6381]# ls
dump.rdb
6381、6382、6383目录生成了dump.rdb文件
测试一波
先连接redis主
使用 info replication查看主从信息
我们在主set 一个值,再去从看看有没有取到
127.0.0.1:6381> set mykey haha
OK
127.0.0.1:6381> get mykey
"haha"
[root@xinyeshuaiqi 6383]# redis-cli -p 6382
127.0.0.1:6382> keys *
1) "mykey"
127.0.0.1:6382>
127.0.0.1:6382>
127.0.0.1:6382> get mykey
"haha"
舒服了,主从数据同步
我们再来试试从支不支持写命令
127.0.0.1:6382> set key1 hehe
(error) READONLY You can't write against a read only slave.
结论:
redis主从集群支持一主多从,主从数据同步,
主支持读写、从只支持读操作
原理:
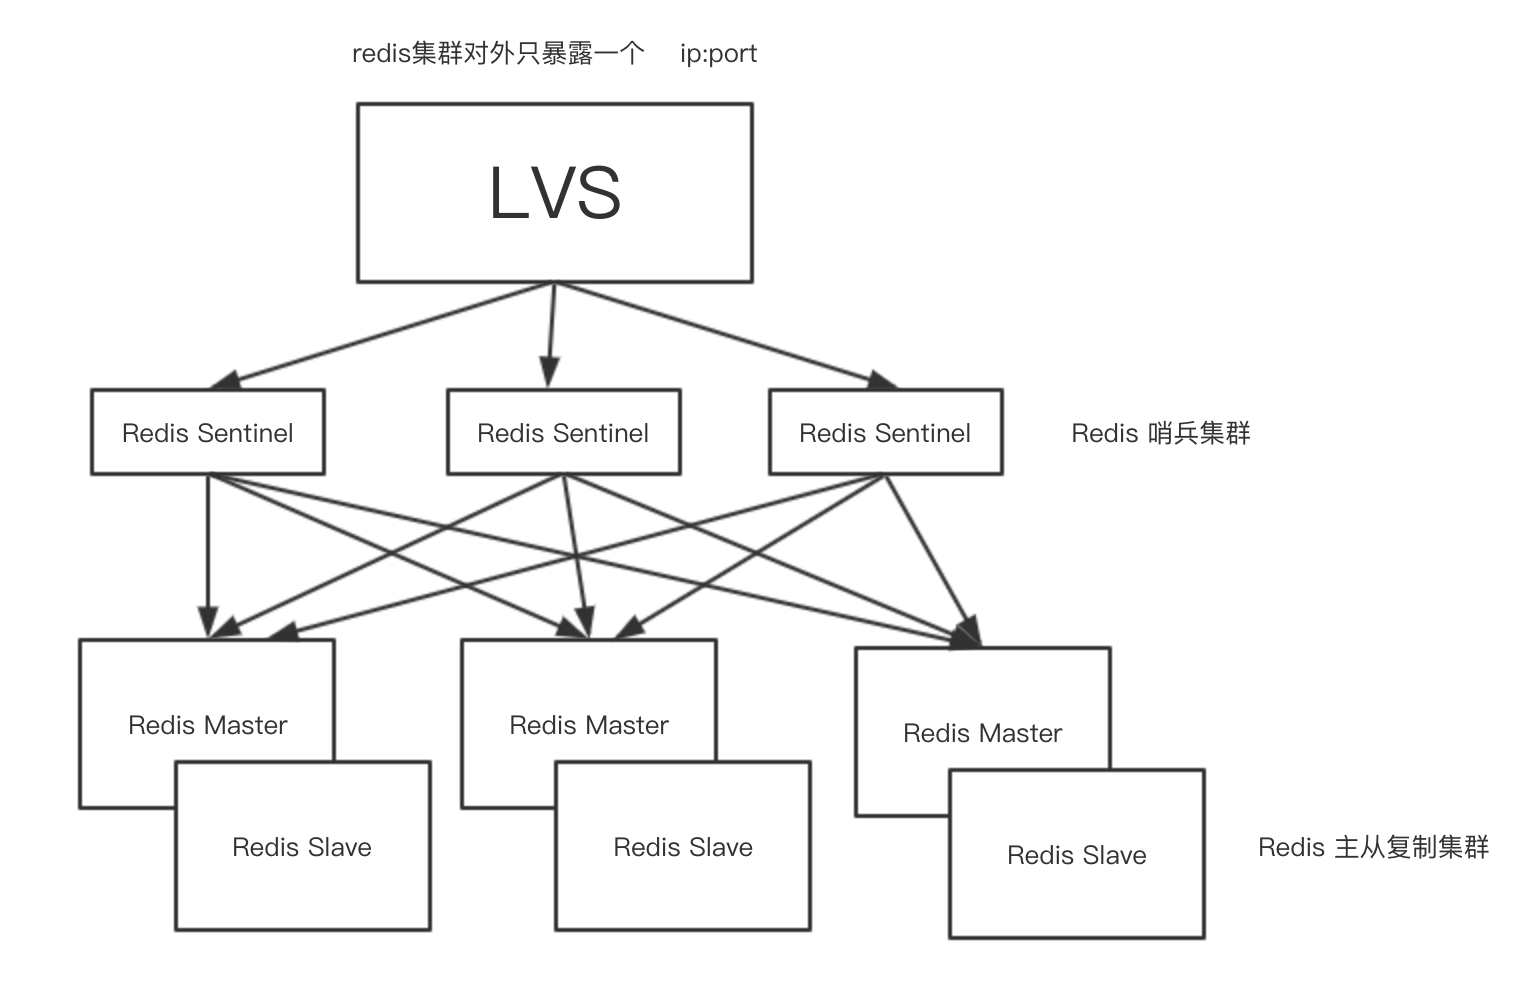
拓展:
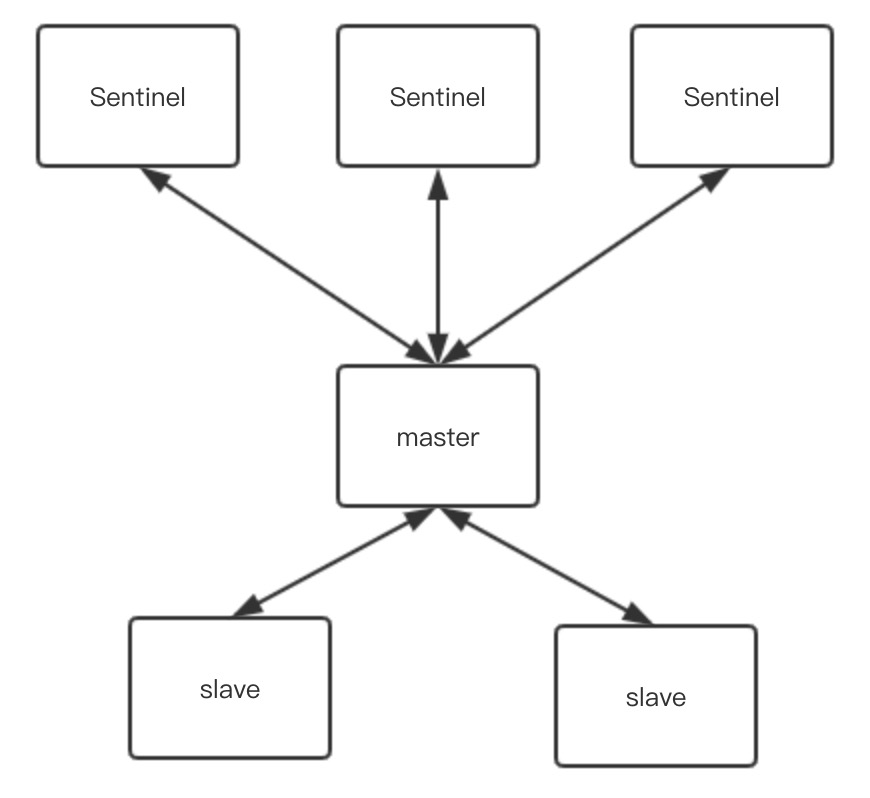
哨兵集群
哨兵 管理redis服务器
redis-sentinel
[root@xinyeshuaiqi redis-3.2.12]# pwd
/root/redis-3.2.12
[root@xinyeshuaiqi redis-3.2.12]# ls
00-RELEASENOTES  BUGS  CONTRIBUTING  COPYING  deps  INSTALL  Makefile  MANIFESTO  README.md  redis  redis.conf  runtest  runtest-cluster  runtest-sentinel  sentinel.conf  src  tests  utils
[root@xinyeshuaiqi redis-3.2.12]#
[root@xinyeshuaiqi redis-3.2.12]# cp sentinel.conf /root/myRedis-sentinel/s1.conf
[root@xinyeshuaiqi redis-3.2.12]# cp sentinel.conf /root/myRedis-sentinel/s2.conf
[root@xinyeshuaiqi redis-3.2.12]# cp sentinel.conf /root/myRedis-sentinel/s3.conf
port 26379
[root@xinyeshuaiqi myRedis-sentinel]# redis-sentinel s1.conf
[root@xinyeshuaiqi myRedis-sentinel]# redis-sentinel s2.conf
[root@xinyeshuaiqi myRedis-sentinel]# redis-sentinel s3.conf
启动哨兵集群
[root@xinyeshuaiqi myRedis-sentinel]# ps -ef |grep redis
root      8407     1  0 14:38 ?        00:00:01 redis-server *:6381
root      8730     1  0 14:44 ?        00:00:01 redis-server *:6382
root      8742     1  0 14:44 ?        00:00:01 redis-server *:6383
root     11390     1  0 15:36 ?        00:00:00 redis-sentinel *:26379 [sentinel]
root     11396     1  0 15:36 ?        00:00:00 redis-sentinel *:26479 [sentinel]
root     11400     1  0 15:36 ?        00:00:00 redis-sentinel *:26579 [sentinel]
root     11455  6728  0 15:37 pts/3    00:00:00 grep --color=auto redis
登陆sentinel 查看信息
[root@xinyeshuaiqi myRedis-sentinel]# redis-cli  -p 26379
127.0.0.1:26379> INFO sentinel
# Sentinel
sentinel_masters:1
sentinel_tilt:0
sentinel_running_scripts:0
sentinel_scripts_queue_length:0
sentinel_simulate_failure_flags:0
master0:name=mymaster,status=ok,address=127.0.0.1:6381,slaves=2,sentinels=3
看到哨兵的主为6381,有2slave
还能看到当前一共有3个哨兵
我们手动把master给干掉
[root@xinyeshuaiqi ~]# ps -ef | grep redis
root      8407     1  0 14:38 ?        00:00:02 redis-server *:6381
root      8730     1  0 14:44 ?        00:00:02 redis-server *:6382
root      8742     1  0 14:44 ?        00:00:02 redis-server *:6383
root     11390     1  0 15:36 ?        00:00:01 redis-sentinel *:26379 [sentinel]
root     11396     1  0 15:36 ?        00:00:01 redis-sentinel *:26479 [sentinel]
root     11400     1  0 15:36 ?        00:00:01 redis-sentinel *:26579 [sentinel]
root     12567 12547  0 15:59 pts/0    00:00:00 grep --color=auto redis
[root@xinyeshuaiqi ~]#
[root@xinyeshuaiqi ~]#
[root@xinyeshuaiqi ~]# kill -9 8407
[root@xinyeshuaiqi ~]#
[root@xinyeshuaiqi ~]#
[root@xinyeshuaiqi ~]# redis-cli -p 26379
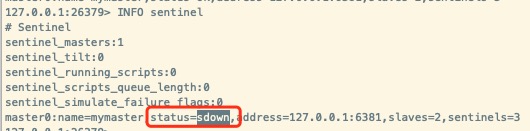
看到6381的状态为down
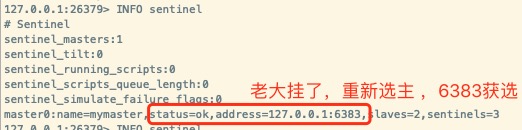
过一会,6383成为主
刚才我忘设置一个东西就是哨兵的日志,在设置哨兵后台运行的同时设置日志的目录
daemonize yes

logfile /root/myRedis-sentinel/logs/sentinel1.log
就可以阻塞式的查看日志了,这里就不再演示了
[root@xinyeshuaiqi log]# redis-cli -p 6383
127.0.0.1:6383>
127.0.0.1:6383>
127.0.0.1:6383> set k2 nima
OK
127.0.0.1:6383> get k2
"nima"
127.0.0.1:6383> info replication
# Replication
role:master
connected_slaves:1
slave0:ip=127.0.0.1,port=6382,state=online,offset=91286,lag=0
master_repl_offset:91286
repl_backlog_active:1
repl_backlog_size:1048576
repl_backlog_first_byte_offset:2
repl_backlog_histlen:91285[root@xinyeshuaiqi log]# redis-cli -p 6381
Could not connect to Redis at 127.0.0.1:6381: Connection refused
Could not connect to Redis at 127.0.0.1:6381: Connection refused
not connected>
连不上哇
我们再来思考一个问题,如果我们现在把曾经的老大复活,他还能成为老大吗???
就像电影黑社会的老大进监狱了,小弟成老大了,老大出狱了,不愿意让位了。。。
redis中是怎木样的呢?我也不知道,试一波
127.0.0.1:6381> info replication
# Replication
role:slave
master_host:127.0.0.1
master_port:6383
master_link_status:up
master_last_io_seconds_ago:0
master_sync_in_progress:0
slave_repl_offset:154533
slave_priority:100
slave_read_only:1
connected_slaves:0
master_repl_offset:0
repl_backlog_active:0
repl_backlog_size:1048576
repl_backlog_first_byte_offset:0
repl_backlog_histlen:0

127.0.0.1:6381> set k3 nanshou
(error) READONLY You can't write against a read only slave.
扎心了,曾经的老大已经成小弟了。。。
[root@xinyeshuaiqi log]# redis-cli -p 6383
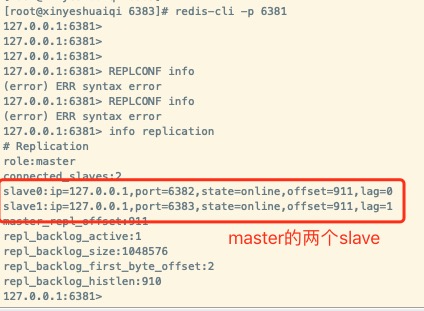
127.0.0.1:6383> info replication
# Replication
role:master
connected_slaves:2
slave0:ip=127.0.0.1,port=6382,state=online,offset=171417,lag=0
slave1:ip=127.0.0.1,port=6381,state=online,offset=171284,lag=0
master_repl_offset:171417
repl_backlog_active:1
repl_backlog_size:1048576
repl_backlog_first_byte_offset:2
repl_backlog_histlen:171416对于现任老大而言,我马上就知道曾经的老大成了我的小弟
操作过程中遇到任何问题可以联系我
转载请注明:汪明鑫的个人博客 » 一步步搭建Redis主从集群和哨兵集群

说点什么
您将是第一位评论人!